Presentation Skills

Cathey Arillas originally wrote the following for people who want to present a Ted Talk, but I think a lot of what she writes here is great for any presentation you are doing. Here are a few excerpts from her presentation on How to Rock a TED Talk.

How to Rock a TED Talk

Have you thought about giving a TED Talk? Imagine stepping out onto the stage and standing on the famous “TED dot” with bright lights shining on you. There is an assembly of people beyond the glaring lights looking up at you. You’re all alone up there, about to share your idea with the world. Now’s not the time to think, “I wish I was better prepared.”

Wait, there’s more. It’s not just those in the audience watching you, it’s the world as well. TED Talks have become a phenomenon. The website, www.ted.com, is currently ranked in the top 500 most visited sites in the US and in the top 800 in the world. They get more hits to their website than Disneyland, the happiest place on earth; Harvard University, the smartest place on earth; The Onion, the funniest place on earth; and The Discovery Channel, the weirdest place on earth. TED is the most intriguing place on earth.

But relax. Thousands of people have been where you are now. And if they can give a rocking TED Talk, you certainly can. Here are a few tips on how to rock your TED Talk.

How to prepare your TED Talk

First, in composing your TED Talk, you should split it into the three parts of what I call the One Storytelling Model:

  • one universal theme,
  • one emotional shift, and
  • one intended outcome.

Your idea should have universal appeal. When you deliver it and support it with evidence, it should cause your audience to have an emotional shift. And finally, they should realize that their life will be impacted in some way because of your idea, which will inspire them to act on it.

While working on my own first TEDx Talk, I watched hundreds of others. I looked for every top 10 list I could find on the Internet, on a huge variety of topics. I started seeing some commonalities, especially in the most popular talks. I compiled for myself a list of TED Talk Essential Elements. While creating your talk, try to incorporate as many of these elements as you can:

1)    Universal Theme

The idea of your talk needs to have a universal theme. It should be simple, understandable, and repeatable.

2)    Catch Phrases

Create and include your own unique phrases that are sticky; phrases that will make people think and remember. Don’t be cliché.

3)    Supporting Evidence

Your idea needs outside supporting evidence, not just your passionate assertion. This is a critical element and should be implemented in a memorable and easy to understand manner.

4)    Memorable Models

Create memorable names for systems or processes that you’ve come up with to help people understand your idea, e.g. “Give love to get love,” which is the rule of reciprocal affinity in marketing.

5)    The Cool Factor

Bring in an element of “wow” to your talk; something that makes it memorable and leaves the audience saying, “That was so cool.” This is the unexpected bonus.
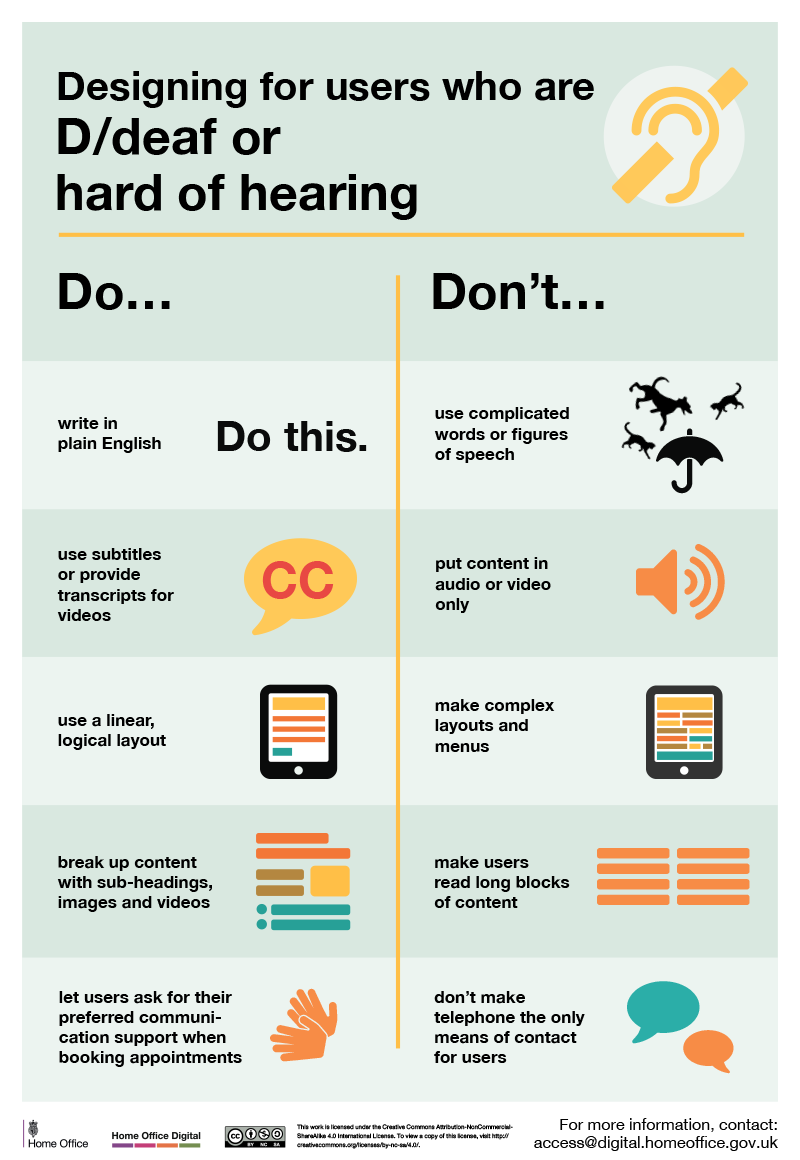
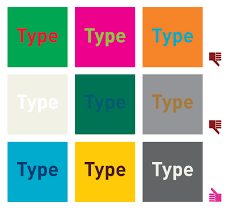
6)    Powerful Visuals

Videos, graphics, photos and other visuals that help get your idea across and also help your audience remember it. Don’t use too many, and the ones you do use should illustrate your point, simply and quickly.

7)    Emotional Connection

Create an emotional connection with the audience by including humor, drama and personal stories. Evoke an emotion that will create a relatable experience for them.

8)    Low Point

Bring the audience down to the low point in your story. This humanizes you and makes you relatable. It also sets up the power of your idea.

9)    Twist Moment

Bring them to the moment when everything changed for you; when you discovered your idea or realized that a change needed to be made.

10) Authenticity & Openness

Be authentic and open during your talk. Your audience will better relate to you. And if you can take it further and poke fun at your own expense, that’s even better.


Once you’ve composed your talk, give it a trial run even if it’s in your living room. Record it and transcribe it word for word, exactly as you said it. It’ll be a painful but revealing exercise. When I was transcribing my talk, I had the urge to transcribe the words I meant to say but didn’t. And then reading what I actually said helped me to choose every word carefully.

This doesn’t mean you should memorize your entire speech, however. In fact, if that’s all you do, it will come across flat and inauthentic. You need to know the subject inside and out so you’ll be able to deliver it in more of a conversational manner. That will keep it fresh. And keep people’s eyes on you.

Finally, imagine where you’re going to give your talk, the stage. Your staging area is limited. More than likely you’ll be on the TED dot, or something similar, so you’ll have to adjust your gestures and movements to fit those limitations.

Your moment arrives

One of the things I do with the speakers I coach for TEDx is to have them stop physically rehearsing their speech a few days before their talk and start mentally preparing.

I once coached a 91-year-old WWII veteran, Frank Moore. He had a really hard time during the preparation of the talk and actually quit on me twice, the 2nd time just a few days before the event. Once he got into the mindset that his idea needed to be shared with the world, that it was less about him and more about the people who needed to hear what he had to say, he eased up and delivered a talk that got him a double standing ovation. In fact, his name was the #3 trending topic on Twitter for that day.

But it’s also about managing the little details. You should, for instance, plan what you’re going to wear. The subject and nature of your talk should be supported by the appropriate outfit. The TEDx organizers will have a dry run a day or two before the event. That is when you need to check out the lights, the stage area, and the monitors that will be in front of you. You’ll need to see what you’re going to be able to see, and know where you’re going to look, so it doesn’t surprise you when you get up on the stage.

Once your talk is ready and you’re prepared to walk out there and stand on the dot, there’s one more thing you have to get right: your mindset. You have to be entirely focused on the audience and the idea. You’re the bridge between them. It all depends on you. But relax. (Easier said than done, I know.) I use this technique: I imagine I’m talking to just one friend about something I really believe in and know passionately. If you really believe in your idea and deliver it with passion and clarity, it may just change the world. So tell yourself that as you’re introduced and you walk out on that stage.

Be a Tedder; share your idea, enjoy the spotlight and rock your TED Talk.

———————————————————

How to Rock a TedTalk was written by Cathey Armillas, who is an organizer for TEDxPortland. She has given a TEDx Talk herself and is an author, marketing strategist and member of NSA. She’s also a TEDx coach; helping celebrities, veterans, industry experts, and people with good ideas deliver the best presentations of their lives. And check out her TEDx Talk at http://bit.ly/catheytedxtalk

I hope you enjoyed this. Thanks for reading, and have a great Weekend!

Collaborate Ultra – Changes and Updates

There have been a few changes and updates to Collaborate Ultra, including an announcement on the much anticipated upgrade to the whiteboard.  There is also a change to Blackboard so read all the way to the bottom!!!! 

Here they are:
(Note: future change dates are shown in Red, and dates that have passed in Purple)


Beta release of the new whiteboard to select clients

Continuous Delivery Collaborate Ultra 20.13 | Release to Production 6 August 2020 (planned)
New features

The new whiteboard is being released as a beta to select clients for testing purposes from 16 July 2020. General availability of the whiteboard is scheduled for 6 August 2020.

Now attendees can enjoy better formatting, usability, and annotation persistence with the release of the new whiteboard annotation tools.  With the improvements to the annotation tools, attendees can enjoy these features on a session whiteboard or shared file.

  • Better formatting: Pencil thickness, fonts and font size, shapes with color fill, arrows, and more are added to the annotation tools.
  • Usability: It’s easier to copy and reuse elements and paste text. You can now erase part of the annotations or clear all. There are multi line text blocks, text wrapping, and safeguards before clearing all annotations.
  • Interaction with breakout groups: You can annotate a file in the main room and then share it with the breakout groups including annotations. More on sharing files with breakout groups.
  • Annotation persistence: Annotations made to the whiteboard, or on a file, are saved in the session. You can share something new, go to a new slide, or stop sharing. The annotations remain. Select Clear Annotations to remove them all.Create a blank file of several pages to have a multi-page whiteboard.
Picture showing a few new features - page size, drawing tool, and shapes

Secure recording links

Continuous Delivery Collaborate Ultra 20.13 | Release to Production 16 July 2020
New features

As part of our commitment to security and privacy, we want to give instructors more control over their recordings. Public access to recordings is now off by default for new sessions. Only session owners and students enrolled in the course can see the recording. Any links shared to the recording will no longer work when the recording is secure. When public access is off, the recording is secure.

Instructors can choose to allow public access in the Recording Settings.  When the Public access check box is selected, a shareable link to the recording is available. Anybody with the link can view the recording while public access is allowed. If the instructor clears the Public access check box later, the shareable link stops working.

If you want the default changed to public access always on, submit a request on Behind the Blackboard. Instructors can choose to turn public access off in the recording settings.

Only recordings made after the 20.13 release have public access turned off by default. All previous recordings have public access on by default. You can change the access for earlier recordings in the recording settings.

Image of recording settings

Browser support updates

Continuous Delivery Collaborate Ultra | Release to Production 1 July 2020
Updated features

As of July 1, 2020 Collaborate will no longer support these browser versions:

  • Native Microsoft Edge ® 
  • Google ChromeTM 78 and earlier

Update your browser to the latest version.

More on browser support


Session owners and admins can always download recordings

Continuous Delivery Collaborate Ultra 20.09 | Release to Production 13 June 2020
New features

Session owners, course instructors, and administrators can now always download recordings even if the option to download recordings is clear in the session settings. Use the Allow recording downloads check box to let everyone else download the recording.

More on session recording settings


Share camera

Continuous Delivery Collaborate Ultra 20.09 | Release to Production 13 June 2020
New features

Collaborate 20.02, 20.04, 20.06, and 20.08 releases included in this 20.09 release.

The Share camera option gives you the ability to share more than one camera. Share your video and share another camera connected to your computer. Students can see you and anything else you want to show. You’re only limited by the number of cameras and USB ports in your computer.

The video will appear backwards to you in the preview. This is normal. Your video will appear correctly to others in the session and in recordings. The video won’t appear backwards to other attendees or in recordings. Video is only mirrored in the preview window.

Picture of pouring liquid into a beaker, shown in Collaborate Ultra

Improved the create and edit session functionality

Continuous Delivery Collaborate Ultra 20.09 | Release to Production 13 June 2020
New features

We have improved the user experience for creating and editing sessions in the Collaborate Ultra Scheduler. This improvement also prevents unintended changes to a session from being accidentally saved. Administrators and session owners now need to save changes with the Save button.

Picture of the Event Scheduler

Download poll results report

Continuous Delivery Collaborate Ultra 20.09 | Release to Production 13 June 2020
New features

Collaborate 20.02, 20.04, 20.06, and 20.08 releases included in this 20.09 release.

Now moderators, instructors, and administrators can download a session’s Poll report. This report includes the poll question and how each attendee responded.

Picture of where to download a poll report
Picture of where to download poll report out of Session Reports

There is also one Blackboard update to let you know about.

New Box View will transition to Bb Annotate next week. Some features may change, but the migration will be “seamless” and not require anything of the Faculty.  There will be no Blackboard outage associated with this change. Right now (7/10/20) we do not have an actual time/date of when this will happen; only that it will occur next week.

As far as resources: 


That’s it!!! Thank you for reading the Faculty Learning Corner! Have a great weekend!!

Accessibility in Online Instruction – Part 6 of 6

Learning Preferences – Challenges and Solutions

This week we look at Learning Preferences.

Learning Preferences are not a disability, but it is good to know how people learn so you can make good choices in your course design.

Today’s video is about 5 minutes long, and will wrap up this six week series.

Here is the index of today’s video:

  • Types of Learning Preferences (0:28)
  • UDL Example (1:36)
  • Using multiple ways of Representing Content (2:10)
  • Giving Students choices to reach the Learning Goal (2:34)
  • Student Engagement (3:54)

As we end this series, it is notable that a lot of people think these principles apply just to people with different kinds of disabilities or impairments. As I have said numerous times in the last six weeks, this really is just good course design. We want consistency in language, as well as keeping things succinct and clear. This will help all your students!!

I also hope you are seeing the importance of being proactive with regards to accessibility. Being proactive in making your courses accessible will help you in the long run, because at some point you will have a disabled student in one of your courses.

Thank you for reading the Faculty Learning Corner!!! Have a Great July 4th weekend!

Accessibility in Online Instruction – Part 5 of 6

Last week we looked at Physical Challenges and Solutions.  This week, our host Susan Riello will be concentrating on Learning Disabilities.

Learning Disabilities – Challenges and Solutions

Learning disabilities are also known as “hidden disabilities” because you might not see them when looking at a student.

Here is the index for today’s video:

  • Learning Disabilities and Challenges (0:18)
  • Course Navigation Solutions (1:03)
  • Course Consistency (2:13)
  • Course Terminology (2:43)
  • Material “Chunking” (3:34)
  • Not Every Disability is Visible (4:58)

Next week we will wrap up this 6 part series. Remember you can come back at anytime and search for posts by topic. Thank you for reading the Faculty Learning Corner. Have a great weekend!

Accessibility in Online Instruction – Part 4 of 6

This week our focus is on physically impaired students, and our host for today’s video is Susan Riello from Yale University’s Center for Emotional Intelligence.

Physical Challenges and Solutions

Today I have two videos for you. The first is the overview with Susan, and the second is a video that she mentions in her presentation.

Here is an index of today’s video:

  • Physical Barriers (0:05)
  • Mouthstick (0:33)
  • Time Limits (1:01)
  • Complex Navagation (1:42)
  • Live Chats/Synchronous Activities (2:00)

This next video is “To Care & Comply: Accessibility of Online Course Content.” This video was created at Portland State University and shows the challenges facing students with disabilities.

Thank you for reading the Faculty Learning Corner. Next week we will focus on Learning Disabilities, their challenges and solutions. Have a great weekend.

Accessibility in Online Instruction – Part 3 of 6

Last week we looked at visual challenges and solutions.  This week we turn our attention to Hearing Challenges and Solutions.  Our host for today’s video is Susan Riello from Yale University.

Hearing Challenges and Solutions

Here is an index of items on this video:

  • Hearing impaired challenges (0:16)
  • Video Captions / Transcripts (1:27)
  • YouTube Captions (2:36)

This is one of the most difficult areas when making your class accessible, because closed captioning can take a good deal of time. That is one reason why being proactive is so important. It’s going to much easier to close caption your videos as you make them.

The other (not recommended) alternative is to wait until you have a disabled student in one of your courses. At that point it’s going to be impossible to get all your videos Closed Captioned in a short amount of time.

Keep working little by little, and make accessibility part of the process. Remember, this isn’t just for those with disabilities; closed captioning can benefit everyone in your courses.

Below are a few more tips:

Poster that says:
Do:
* write in plain English
* use subtitles or provide transcripts for video
* use a linear, logical layout
* break up content with sub-headings, images and videos
* let users ask for their preferred communication support when booking appointments

Don’t:
* use complicated words or figures of speech
* put content in audio or video only
* make complex layouts and menus
* make users read long blocks of content
* don’t make telephone the only means of contact for users

Next week we look at Physical Challenges and Solutions.

Contact your Instructional Designer if you need help! Have a great weekend, and thank you for reading the Faculty Learning Corner.

Accessibility in Online Instruction – Part 2 of 6

Lock and chain, which are locking a door

Last week, in part 1 of our 6 part series, we looked at the definition of accessibility, and also universal design for learning (UDL). 

We also saw that the content in an inaccessible course is like a “locked box.”  The three keys to unlocking that box are:

  • Representation – Using different ways of getting information and passing on to students
  • Expression – Using different ways to have students express what they know
  • Engagement – Allowing students to use their personal interest and connections to the assignment

Visual Challenges and Solutions

This week we are going to concentrate on issues that effect visually impaired students. This video will help you to understand the challenges, and give you solutions that can immediately be implemented in your courses.

Here is an index of the video, that will help you easily go back and review items.

  • Challenges for Online Students (0:22)
  • Screen Readers (2:48)
  • Microsoft Word Solutions (5:05)
  • MS Word Solution Example (5:36)
  • Alt-Text (9:00)
  • Alt-Text Tips (9:34)
  • Alt-Text in Blackboard (11:12)
  • Page Breaks (11:33)
  • Accessibility Checker (12:31)

I hope this gives you some ideas on how to make your courses accessible. One of the things to remember as you check the accessibility of your courses is that making these changes not only helps those with disabilities, it actually helps all students. Accessible design is overall good design.

Next week we will concentrate on Hearing Challenges and Solutions.

Thank you for reading the FLC! Have a great weekend!

Accessibility in Online Instruction – Part 1 of 6

For the next six weeks I am going to present you with a webinar on Accessibility that was done by my friend Susan Riello, who works at Yale University’s Center for Emotional Intelligence.  I have broken the presentation up into sections.

Today’s topic covers basics – terminology and an overview of each area we are going to be covering.  Click the video below to get started.

Here are a few key areas of today’s video!

  • Accessibility Definition (1:55)
  • Universal Design for Learning (UDL) (3:01)
  • The Locked Box and 3 Keys (3:20)

Thanks for reading the Faculty Learning Corner. Next week we will dive in and discuss challenges and solutions for visually impaired students.

Have a great weekend and I’ll see you next week.

Accessibility

In the sprint to get face-to-face classes online we may have forgotten our most vulnerable students – those with disabilities.  We know that Summer Semester is online.  There have also been hints that an online Fall Semester might be in our future, depending on what happens this Summer.  With this in mind, it’s probably time to step back and evaluate if your courses are accessible.

Closed Captioning Logo

Making a course accessible does take a little extra time, and added effort on the part of the Faculty member. This is especially true with Closed Captioning video. If you have created the video, it is important that you make it accessible.

And accessibility doesn’t stop at closed captioning! We need Alt-Tags on pictures, documents that that have accessible headings, descriptive links, and use of page breaks, as well as paying attention to color contrast within documents. We also need to factor in challenges that physically handicapped students have, as well as those with learning disabilities.

Chart with  nine examples of color contrast.

Whew, that might look overwhelming, but it is so important to take these things into consideration and proactively build courses with this in mind, rather than waiting for a student with accommodations to enter your course. The part that’s overwhelming is not the work to make your course accessible, it’s the thought of doing it all at once…. Being proactive will eliminate this.

Over the coming weeks I am going to try to give tips on what you can do to become accessible in your courses, one topic at a time.

Here is your first assignment – Take a look at this information from W3C.org:

How: Make Your Website and Web Tools Accessible

Most of the basics of accessibility are fairly easy to implement. However, if you are new to accessibility, it takes some time and effort to learn the common issues and solutions. Here are places to start:

Some accessibility barriers are more complicated to avoid and the solutions take more development time and effort. W3C WAI provides extensive resources to help, such as Tutorials and support materials linked from the WCAG 2 Overview.

Using authoring tools that support accessibility makes it easier for web developers. Browsers also play a role in accessibility. These roles are explained in Essential Components of Web Accessibility.

I also want to remind you that the steps you take in making your courses accessible not only help those with disabilities, but help everyone in your class. Accessible design is actually good course design!!!

Thanks for reading and I’m looking forward to bringing you more information in the coming weeks!

Improving Video Content

Today’s Faculty Learning Corner comes out of a video blog by Ant Pugh entitled “How Jimi Hendrix Will Improve Your Training.”  The video (below) is less than 4 minutes. 

I also need to tell you that he uses a clip from the movie “White Men Can’t Jump,” which contains explicit language.

Warning – Explicit Language

What I like about this video, is that it is packed with information on how to communicate effectively in your course. Some of the points to think about are:

  • We want the student to do more than just listen and regurgitate information. We want them to connect to our lessons and internalize the message.
  • We want our message to stir something inside our learners, and make them think from a different perspective.
  • What we may want to do is to give the student all the information we have, telling the learner everything they need to hear. Instead we need to concentrate on the frequency, and the way we deliver, the message. (Only give them the “need to know” information and skip the “nice to know” information.)
  • You don’t need to be totally scripted – an informal approach can work better. The listener is more likely to “hear” what you say, rather than just “listen” when you take a more informal delivery style.
  • Talk to your learners in a conversational and natural tone.

As you start the Summer semester, and begin building Fall courses, remember to make them real and engaging. If you are having trouble, please contact your instructional designer. They are there to help you to get where you want to go.

Thanks for reading the Faculty Learning Corner. Have a great weekend!